8 ways to send SFMC Emails to your SF CRM Leads / Contacts
Quite often, we have Salesforce Marketing Cloud being used in conjunction with Salesforce CRM (Sales / Service Cloud) and marketing teams need to send SFMC emails to Leads / Contacts that reside in the CRM system. The Marketing Cloud Connect managed package helps with integrating Sales / Service Cloud with Marketing Cloud – but how many different options are you aware of, for sending an SFMC email to a CRM Lead / Contact?
I have listed down 8 different options below that you can consider – do note that there may potentially be more ways that you can design and implement a solution for this – but I want you to be familiar with at least these 8 ones. You should evaluate multiple options, but try to choose the simplest one that fits your requirement.
Options 1-6 below require the Marketing Cloud Connect package to be installed on the Sales / Service cloud instance and integrated with the SFMC instance. Options 7-8 leverage programmatic options and don’t rely on the Marketing Cloud Connect package.
Option 1 – Send SFMC Email to CRM Campaign / Report from SF CRM
Using Marketing Cloud Connect App in SF CRM
If your primary requirement is to enable SF CRM users (for e.g. Sales team members) to be able to send emails without having to log into Marketing Cloud but utilize the SFMC specific emails that is approved by your marketing teams, then you can use the Marketing Cloud app that gets installed along with the Marketing Cloud Connect package in the Sales / Service Cloud instance.
Under App Launcher – you should see the “Marketing Cloud” tab – clicking on this will launch the VF Page that connects with Marketing Cloud. Do note that sometimes you may be prompted to reconnect to Marketing Cloud and login to establish the connection.
By default, you get the Email Send screen as shown below – the SF CRM user can select the required SFMC Email and then select a Report / Campaign from the SF CRM instance as the target. The user can also specify a Report / Campaign for Exclusion. Do ensure that you have the Reports / Campaigns created with Leads or Contacts in advance as well as an appropriate SFMC Email that the SF CRM user can use for this use case.
For more details about the Email Send, please refer to this documentation.
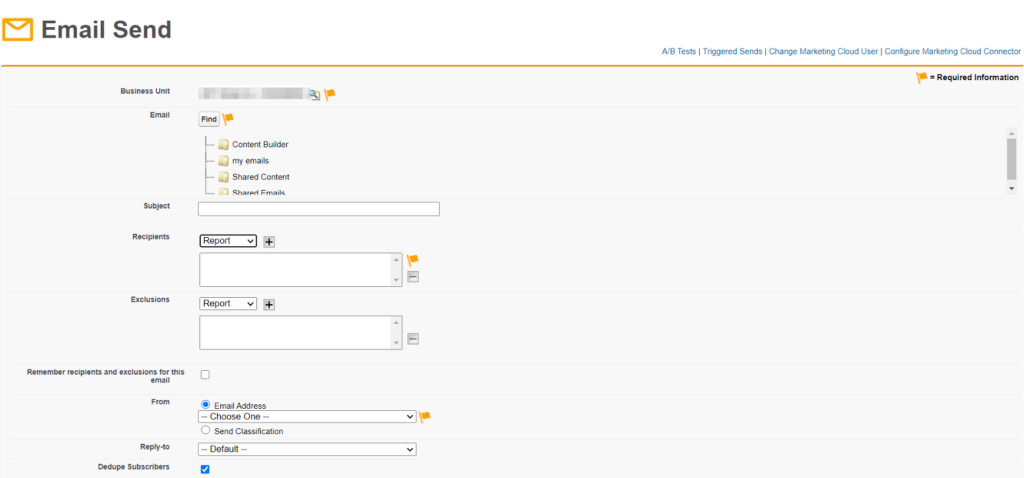
The above option is great if you want to send the SFMC Email to multiple Leads / Contacts – but you also have the option to send a Single Email to a Lead or Contact from the SF CRM instance as well. For this, you will need to go into Setup > Object Manager – and then for the Lead and Contact Page Layouts, you will need to enable the Send Marketing Cloud Email custom link. You should then be able to view this Custom Link on the Contact / Lead detail page as shown below.
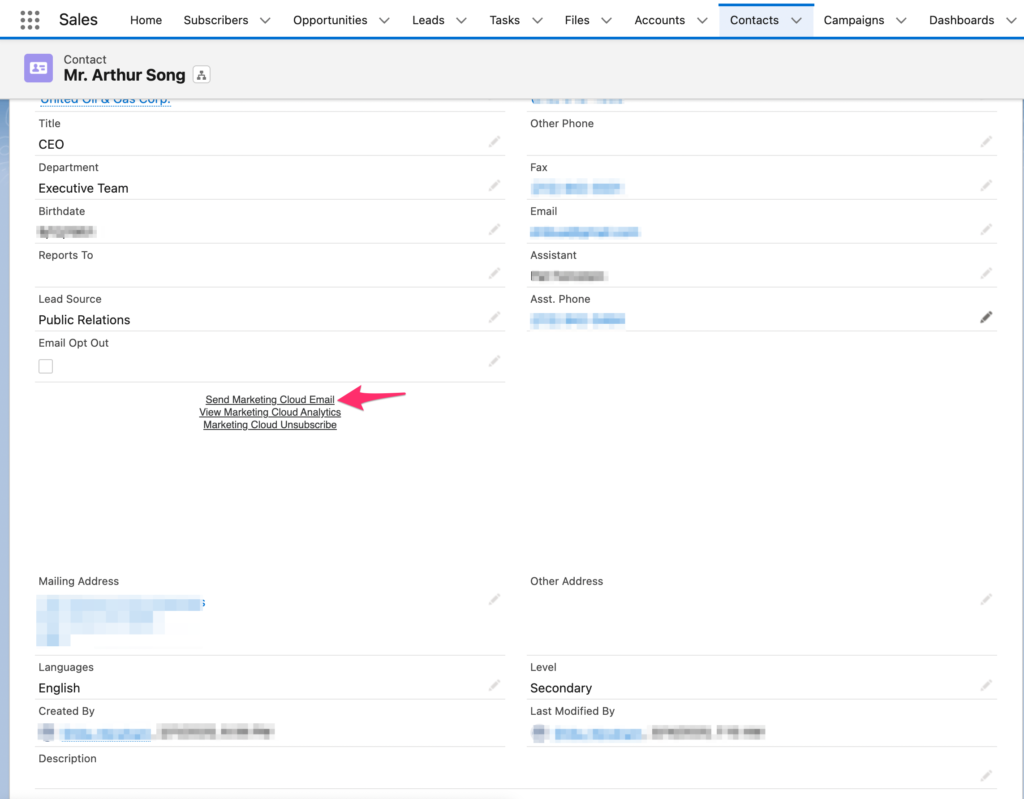
Clicking on this custom link will open a similar Email Send interface that we saw earlier – but this time, instead of a Report / Campaign, the target will be the specific Lead / Contact from where you clicked the custom link. The rest of the process is the same as before.
For more details, refer to this documentation.

Option 2 – Triggered Send from SF CRM
Using Marketing Cloud Connect App and Apex Trigger
At times, you may come across a scenario where you would want an SFMC email to be triggered to a Lead or Contact based on create or update. The Marketing Cloud app in Sales / Service Clound instance that we saw in Option 1 does support Triggered Sends as well.
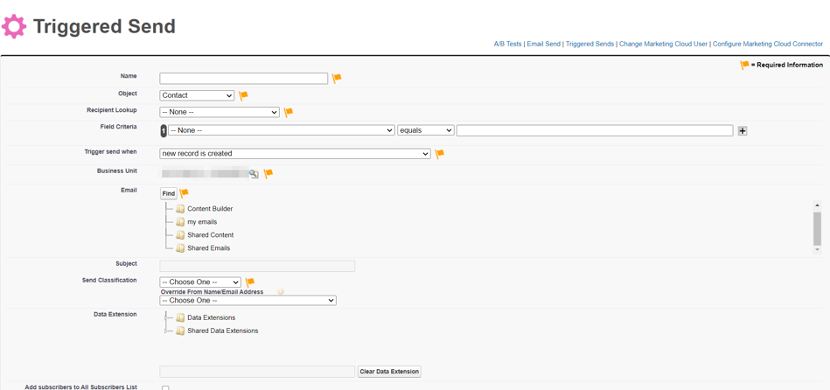
You will need to write an Apex Trigger (after insert / after update) for the Lead or Contact object in this case – and then use the Configuration screen shown below to specify the conditions and email send properties. This option is very useful if you want an automated mechanism to send SFMC emails for SF CRM Leads / Contacts based on actions on the CRM side.
For more details on how to configure the Triggered Send, including the sample code for the Apex Trigger, please refer to this documentation.
Option 3 – Salesforce Send from SFMC to a CRM Report / Campaign
Using Email Studio, Automation Studio and MC Connect
This option enables a Marketing Cloud user to send out an SFMC Email to an SF CRM Report / Campaign containing Leads or Contacts. Within Email Studio > Interactions tab, you have an option to create a Salesforce Send. The first part of the configuration is basically around the Email and Send properties as shown below – some of these get pre-populated when you select an existing Email.
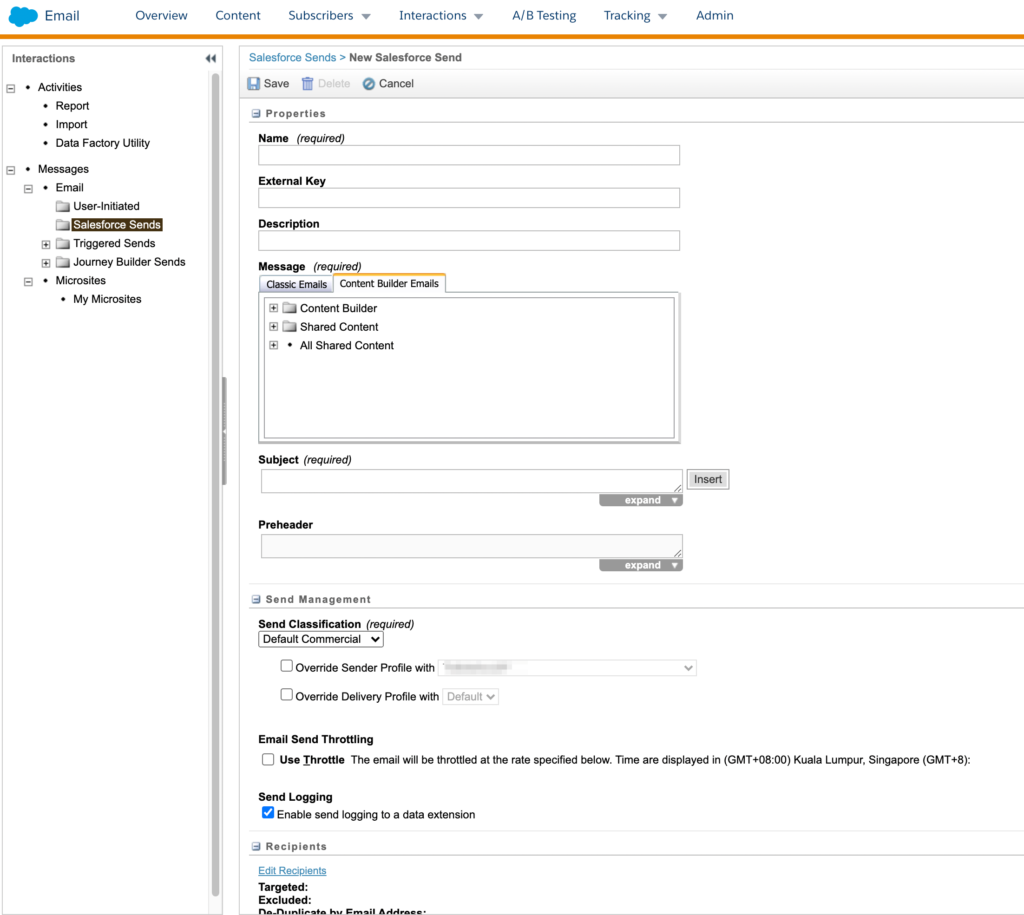
To add a Salesforce Report or Campaign as a Target (and Exclusion if needed), click on Edit Recipients and then select the appropriate option as shown below.
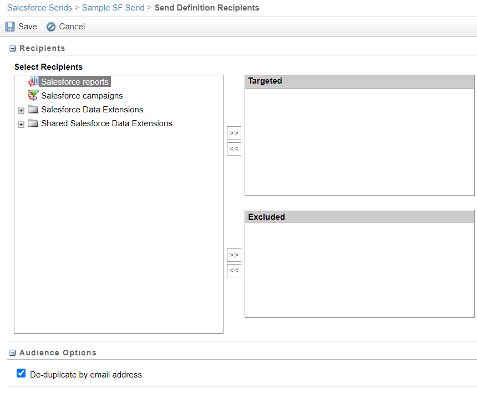
A popup will be shown that pulls in all the accessible reports from the connected SF CRM instance – select the required Reports / Campaigns to be added to the Target or Exclusions sections.
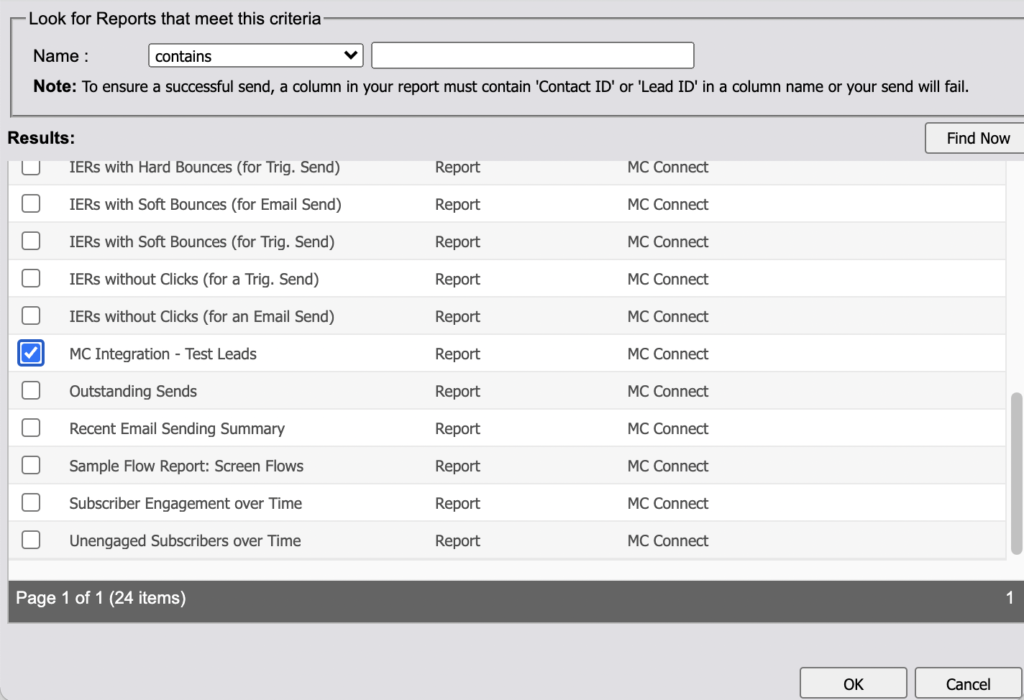
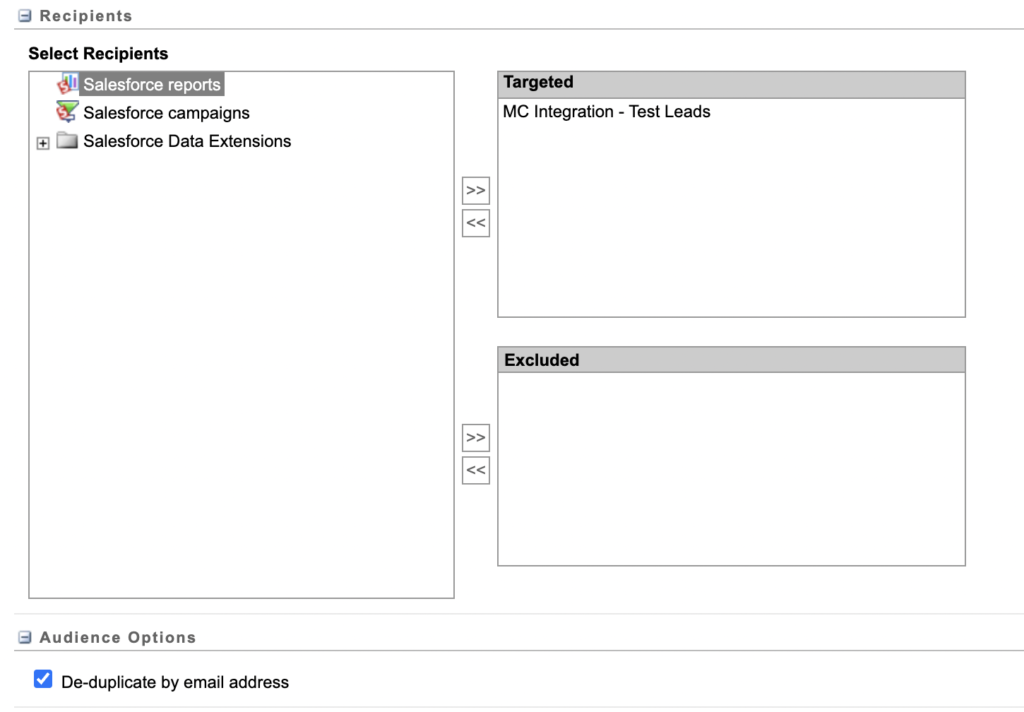
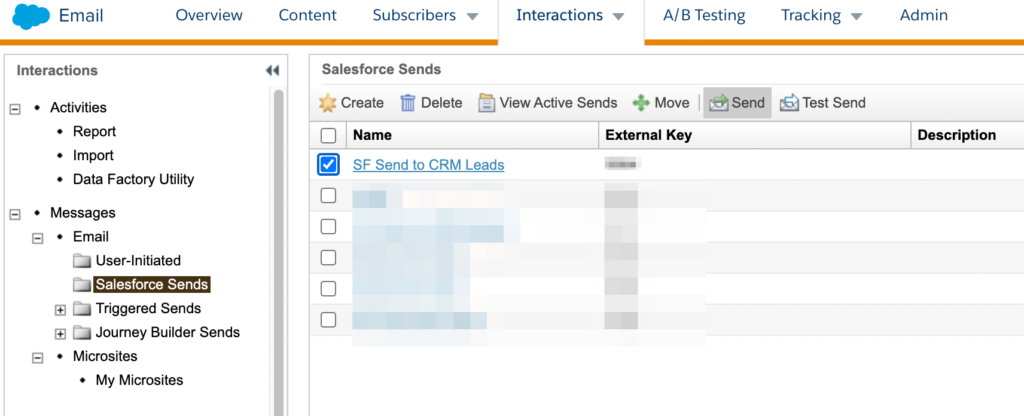
Once you save the Salesforce Send configuration under Interactions, you can then select it any time and perform a send manually using the menu option as shown below.
If you need to use this Salesforce Send definition to send emails out to the configured Report / Campaign in an automated process, then you can extend this solution further through Automation Studio. In a new Automation Workflow, choose the Schedule starting source and drag in the Salesforce Email Send activity from the left Activities pane into Step 1.
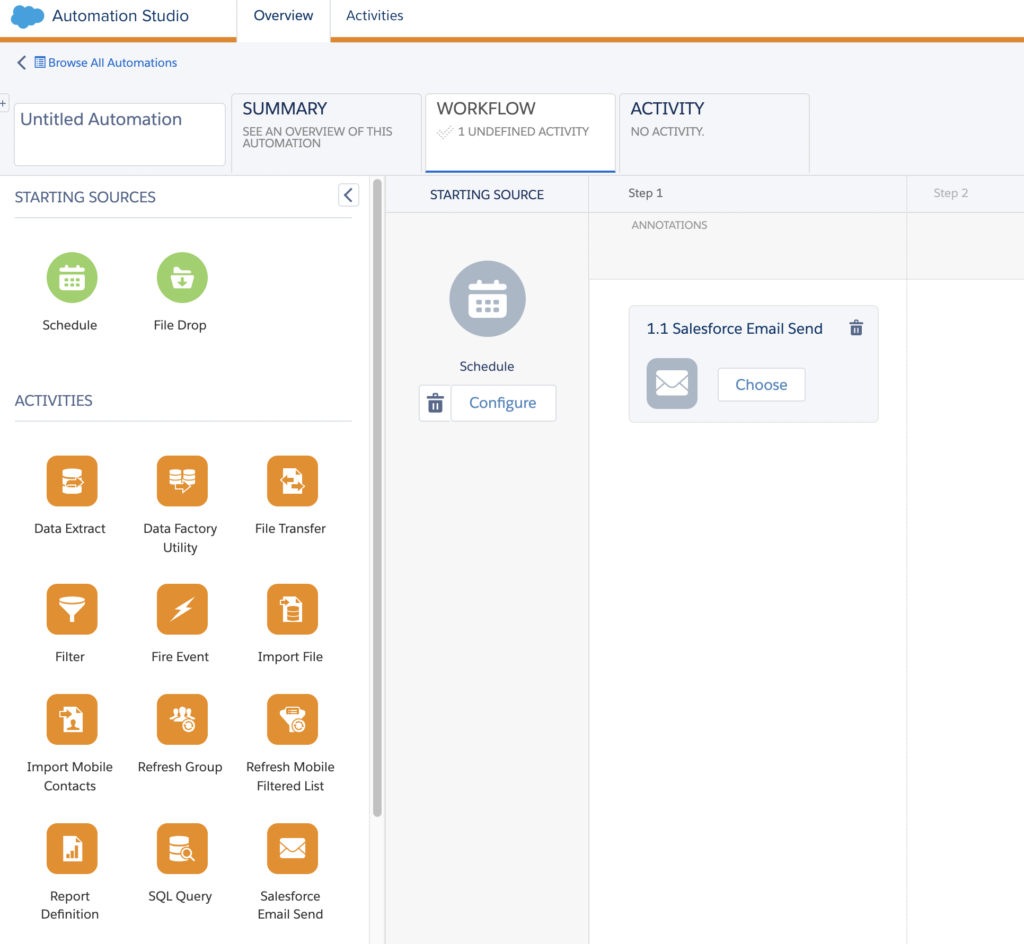
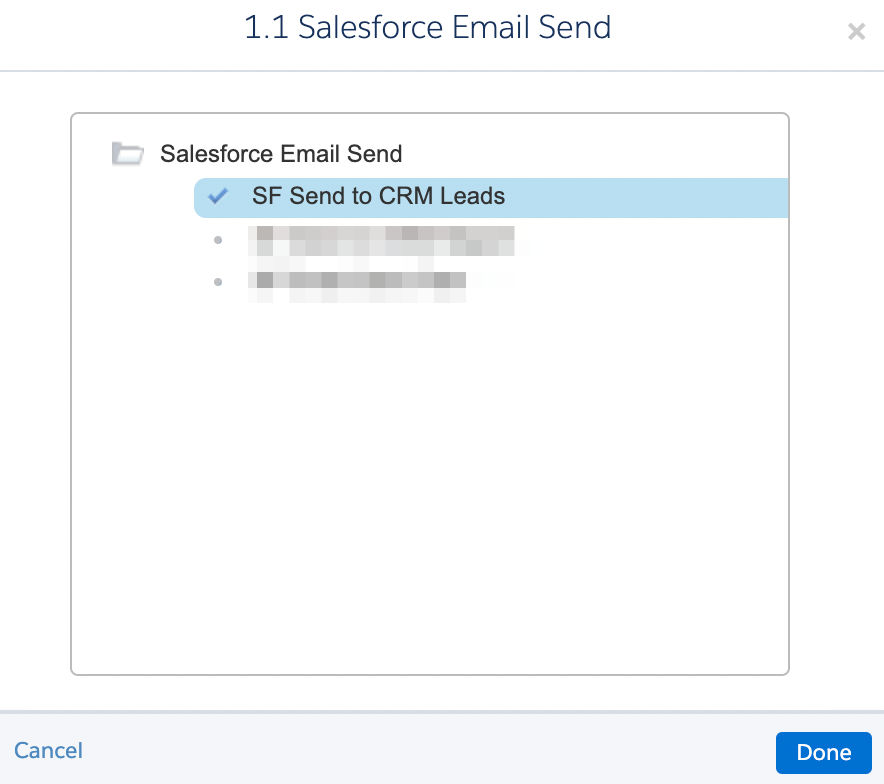
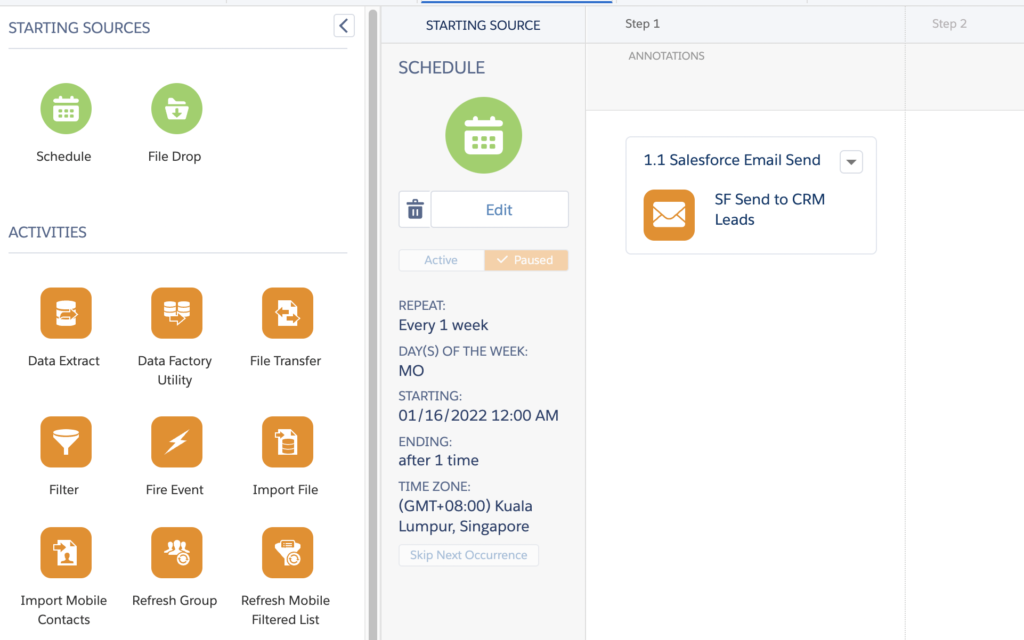
Configure both the Schedule and the Salesforce Email Send activities as shown below.
Option 4 – Import SF CRM Object / Report and Use in Automation
Using Email Studio, Automation Studio and MC Connect
Quite a few of you may be familiar with the option of using Import File Activity for reading data from a File in FTP / Safehouse and then updating a Data Extension. However there’s an additional option of being able to select Salesforce Objects and Reports as a File location – so you can actually import Salesforce Object or Report data from SF CRM into SFMC without having to go through FTP.
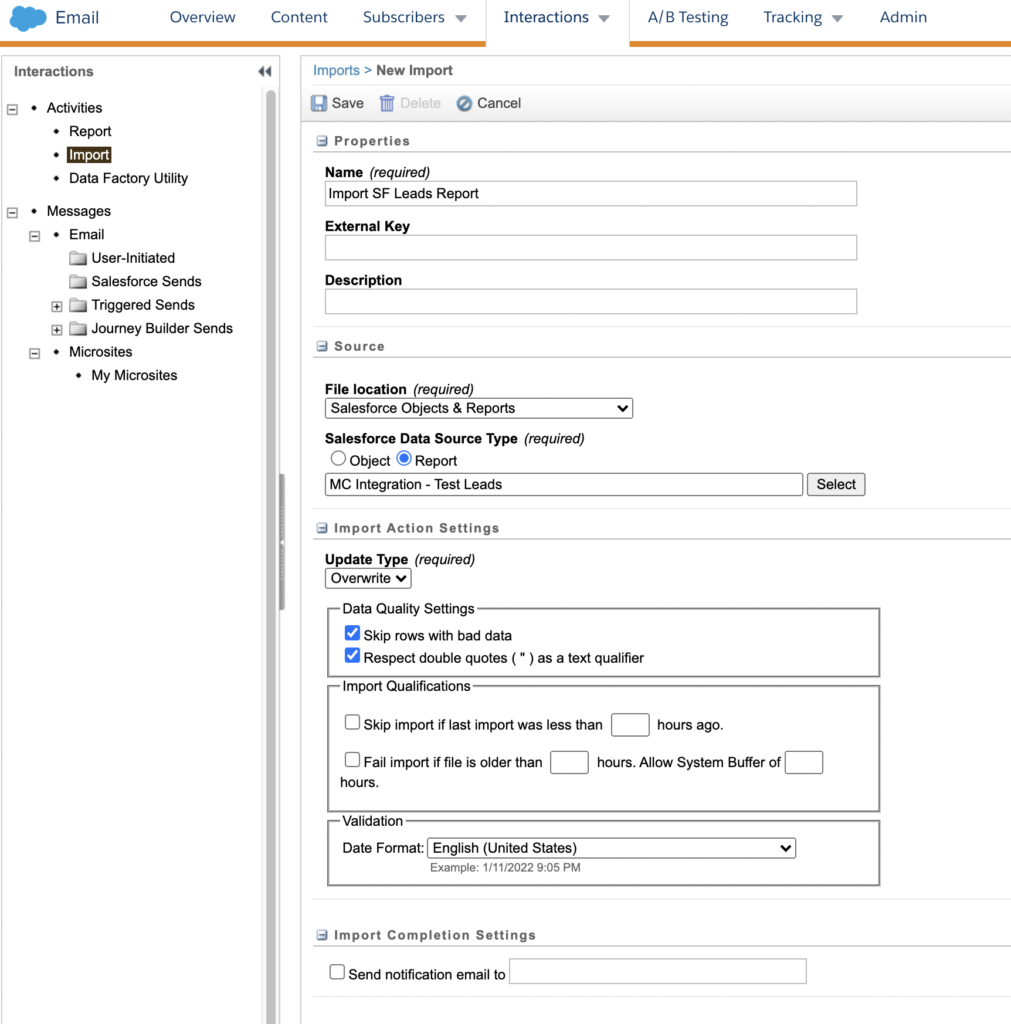
Before we can use the Automation Studio Import Activity for this use case, we need to configure an Import Interaction in Email Studio > Interactions tab as shown below. For the Source section, choose “Salesforce Objects and Reports” in the File Location dropdown. Then select either Object or Report option and pick the appropriate one to import data from. You can specify additional options for the Import as well as a notification email to be alerted about the Import completion each time it is executed.

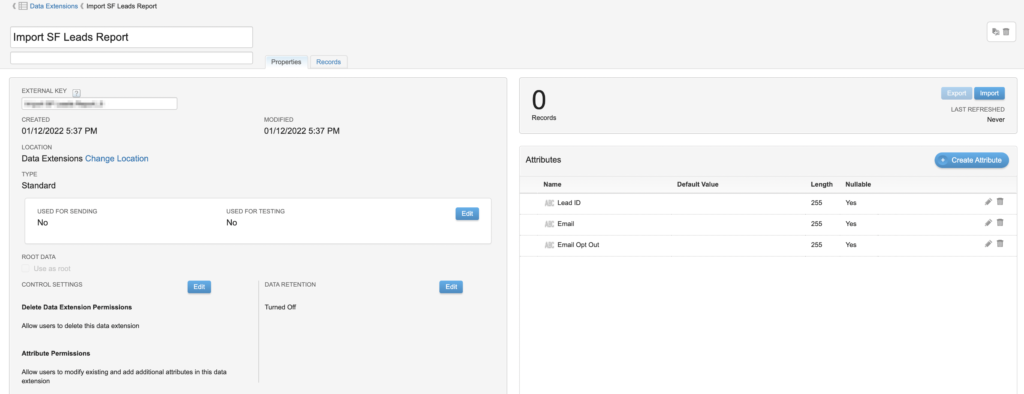
After you select the Report or Object, you will be asked to confirm the fields to be imported into SFMC – a new Data Extension with a name similar to the Import Interaction definition will be created with the field labels and data types as shown below. You do have the option to customize these prior to finalizing the Import setup.
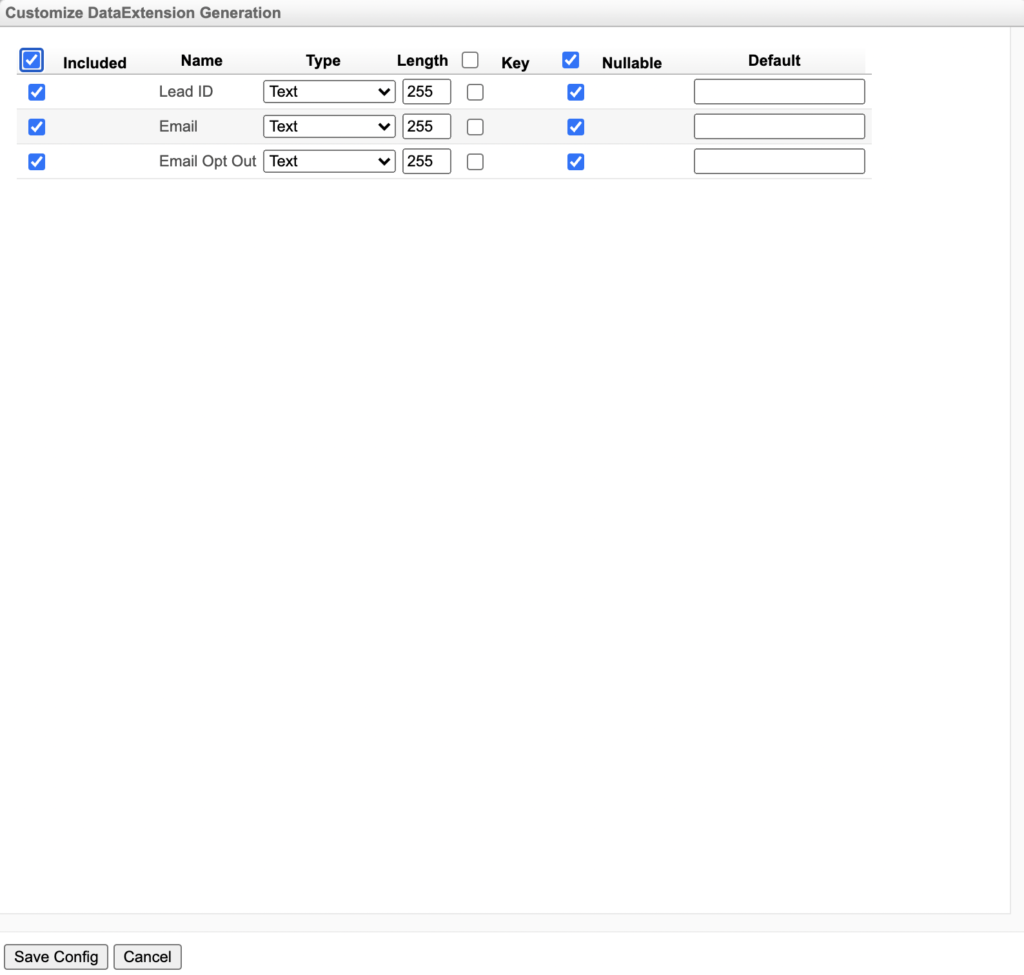
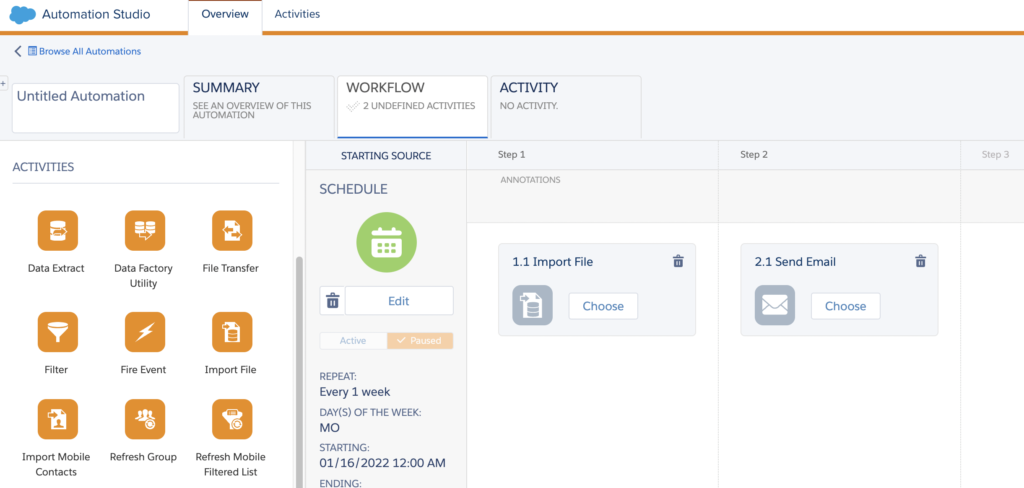
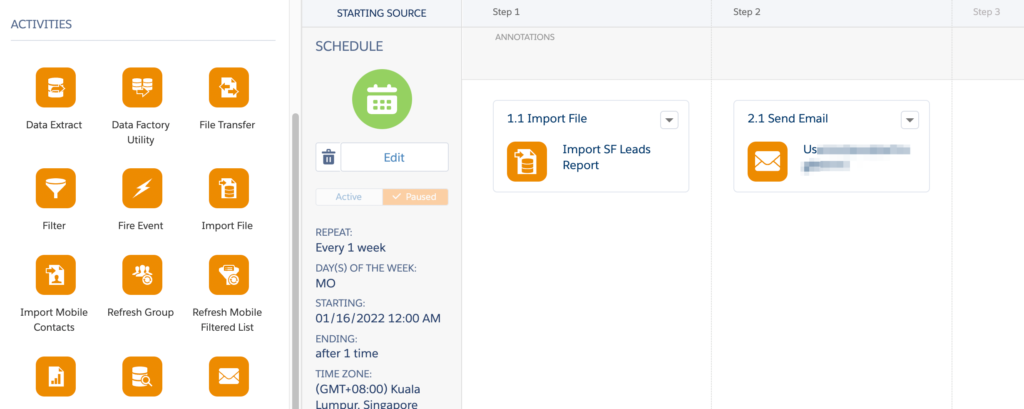
Once the Import Interaction has been successfully saved, you can now select this in an Import File Activity in Automation Studio. Configure an Automation Workflow with Schedule starting source, Import File and Send Email Activities as shown below.
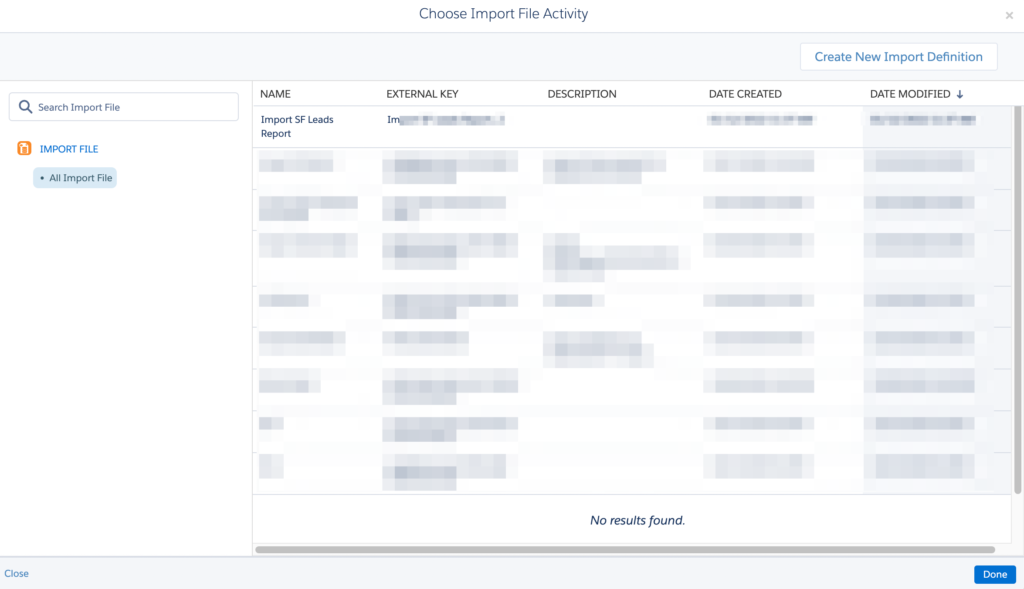
Select the newly configured Import Interaction from the Import File activity configuration as shown below.
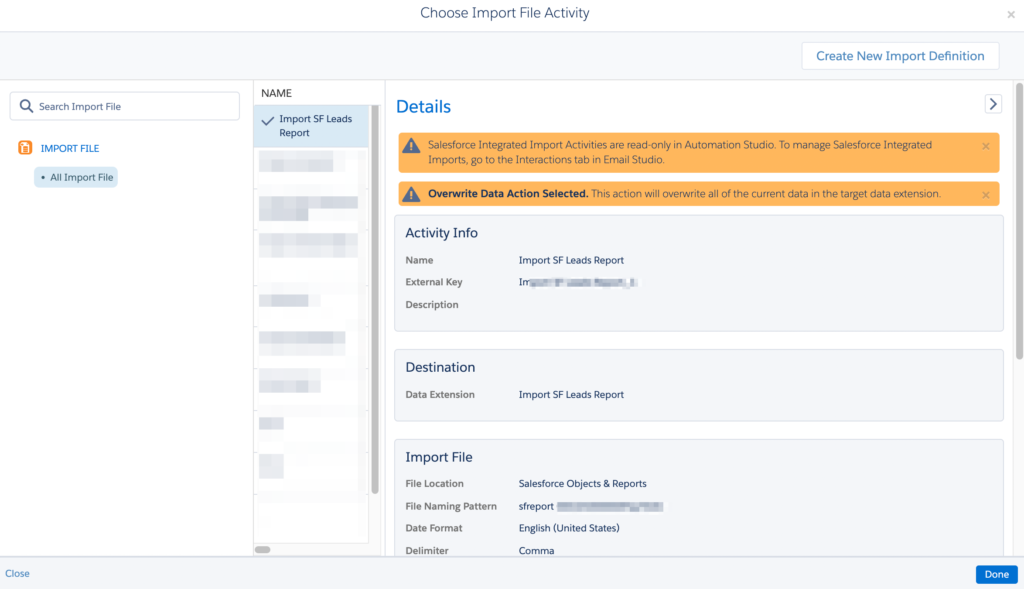
You will be able to verify the details of the Import from the activity configuration – however you will not be able to edit these from Automation Studio. For any configuration updates, please use the Import Interaction saved in Email Studio.
Below is how your Automation Workflow should look like once you have selected the Import Interaction and configured a Send Email activity.
You can navigate to the Data Extensions section either in Email Studio or Contact Builder and be able to view the newly created Data Extension for this Import Interaction.
Option 5 – Use Synchronized DE & Segment to Automation or Journey
Using MC Connect and Automation Studio / Journey Builder
One of the advantages of using Marketing Cloud Connect is being able to create Synchronized Data Extensions in SFMC using SF CRM object data. You can configure this under Contact Builder > Data Sources. Configure the Lead or Contacts object to bring in the corresponding records into SFMC on a periodic basis – the polling can be done as low as every 15 min. You can even set filter criteria of what records to bring in from SF CRM into SFMC.
You should be able to view all the Synchronized Data Extensions as shown below in your Data Extensions tab in Contact Builder.
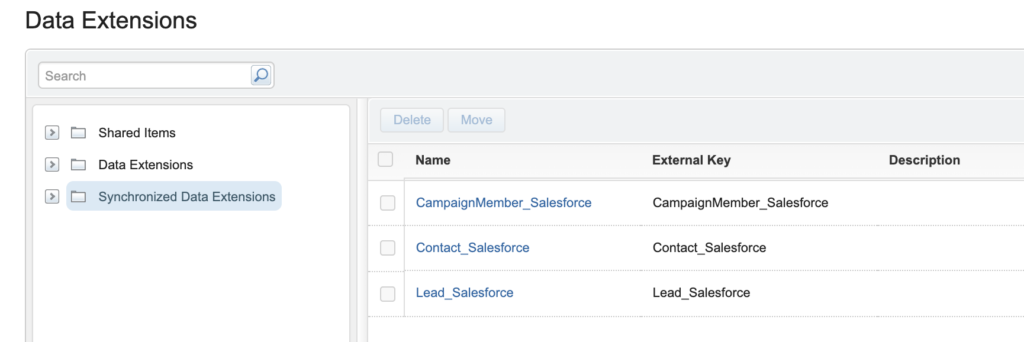
One of the limitations of the Synchronized DEs is that you cannot use them directly in Email Sends especially in Journeys. The workaround is to then segment the data from the Synchronized DEs using Filter / SQL Query activities into a new sendable DE and then either use the Send Email activity in Automation Studio or as entry source to a Journey.
This option is quite useful when you don’t need any real-time email sends and have specific segmentation to be applied on CRM data before pulling them into an Email communication.

Option 6 – Use Salesforce Data Entry Source in a Journey
Using Journey Builder and MC Connect
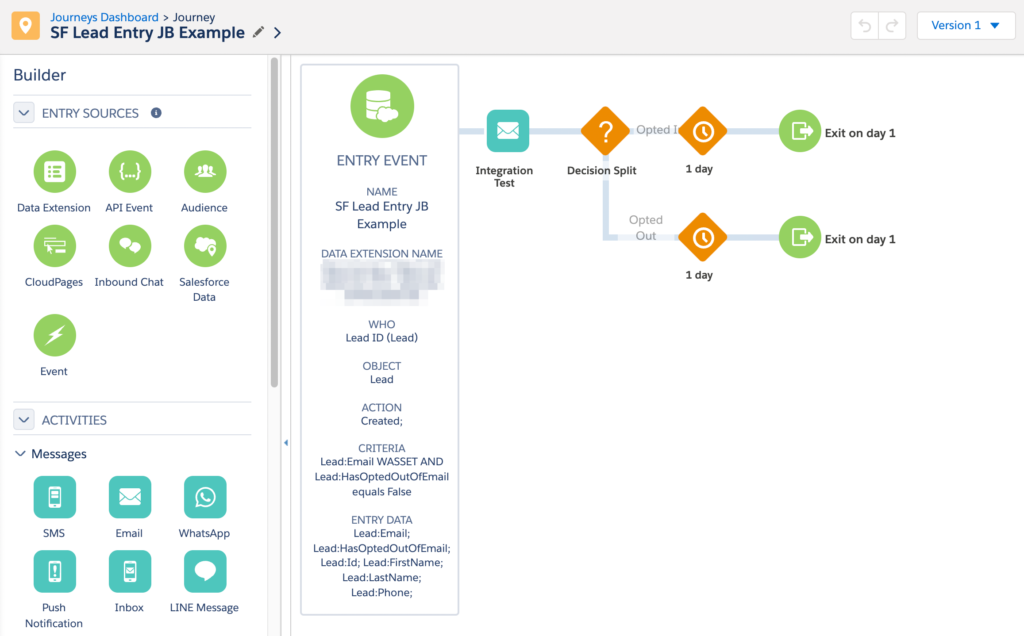
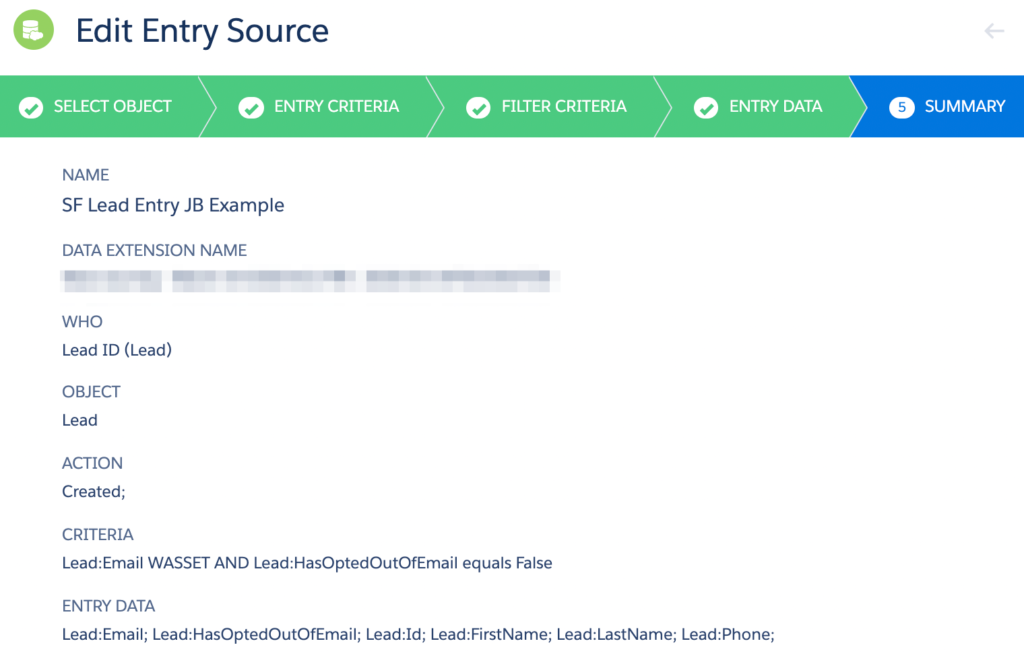
One of the most powerful options in Journey Builder is to be able to directly pull in an SF CRM Lead / Contact into a journey using the Salesforce Data Entry Source. This option saves you from having to bring in the CRM data into a Synchronized DE and then applying segmentation to get the records into a Sendable DE for the journey.
The SF CRM Lead / Contact is pushed into the journey in near real-time depending on the entry and filter conditions configured for the entry source. The journey creates a Data Extension associated with it as well which shall contain each of the Lead / Contact records that are brought into the journey from SF CRM.
Do note that performance may take a hit if you expect a large amount of Leads / Contacts to be evaluated from the SF CRM side and pushed into the journey – for e.g. if you make a mass update on the SF CRM side causing a high volume of Lead / Contact records to be valid for the journey entry. In this case, it may be better to pull these records in through a Synchronized DE, segmented to a sendable DE and then use Automation Email Send or regular Data Extension entry based Journey.
Option 7 – Inject Contact into Transactional Send Journey from SF CRM
Using Transactional Messaging API, SF CRM Automation / Lightning Component / Apex
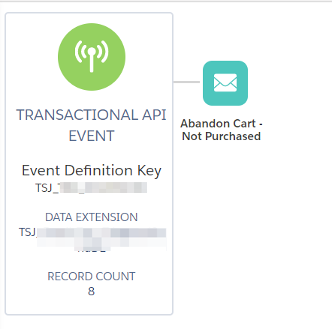
This is a new type of Journey that was introduced recently and is very useful for Transactional messaging. Many a times we have transactional emails like Order Confirmation, Profile Password updates, etc. to be sent to a Contact. Rather than using a regular Single Step or Multi-step journey, it’s best to use the Transactional Send Journey option. This option creates an API entry source – and can be used from SF CRM to send contact data to the journey.
This option is useful if you require automated mechanism to send SFMC transactional notifications to your CRM Leads / Contacts – your IT team can help incorporate the API call from SF CRM code with the appropriate Lead / Contact data and push it into the Transactional Send Journey. Another use case may be if your Service Agents in Service Cloud need to have a manual option to send a Transactional Email to a Contact they are servicing.
Transaction Send Journeys are known to be more performant than regular journeys and triggered sends – so if you have a Transactional Messaging use case, then do try to use this option. However DO NOT use Transactional Send Journeys for Commercial marketing sends.
More details about the Transactional Send Journey and Transactional Messaging API are given below:
Option 8 – Inject Contact into Journey from SF CRM
Using Interaction API, SF CRM Automation / Lightning Component / Apex
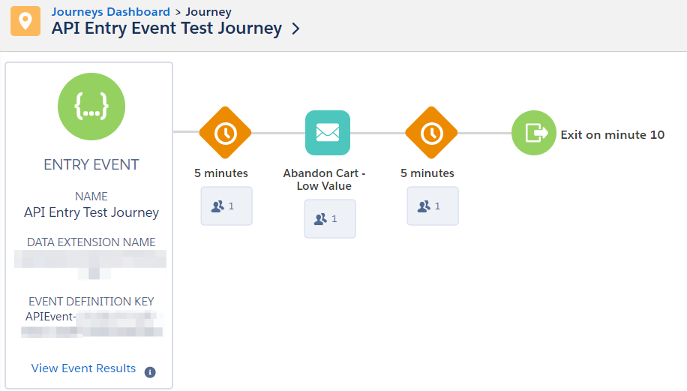
If you need a custom option to send a Lead / Contact from SF CRM into an SFMC Journey, then you can use the API Entry source based Journey option. You will need to call the Interaction Fire Event REST API for this and use the API event definition key from the entry source configured in SFMC journey.
One potential use case maybe if your SF CRM user has a Lightning component or Lead / Contact record page where they want to send them into a journey manually.
Hopefully you are now armed with a number of solution options the next time you need to consider sending SFMC Emails to an SF CRM Lead / Contact.
Nice article…!!!
Correct