How to send Marketing Cloud data to SF CRM using SSJS and Bulk API 2.0
You may already have seen how you can bring data from Salesforce CRM into Marketing Cloud through MC Connect and Synchronised Data Extensions. In this article, let’s look at one of the ways in which you can send data from a Marketing Cloud Data Extension back to a Salesforce CRM object. We shall be using SSJS and REST API along with Salesforce Bulk API 2.0.
Bulk API provides an interface by which we can quickly load large amounts of data into our Salesforce org – the 2.0 version being the new and updated one. One of the advantages for using the Bulk API 2.0 request is that we can send upto 150,000,000 records in a 24-hour period with a max data size of 150MB per request. Below is the limits that need to be considered when using the Bulk API 2.0 request.
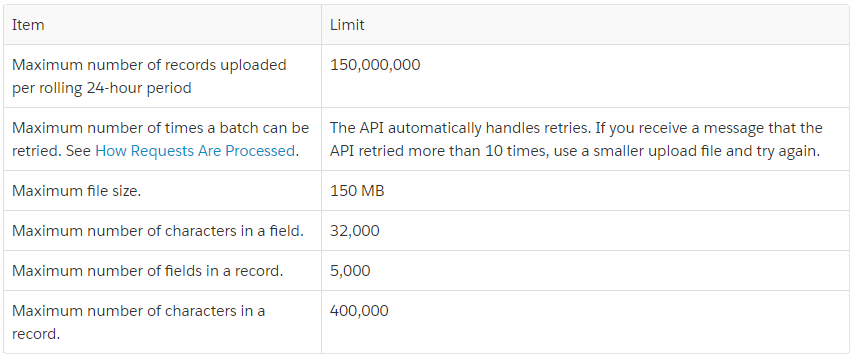
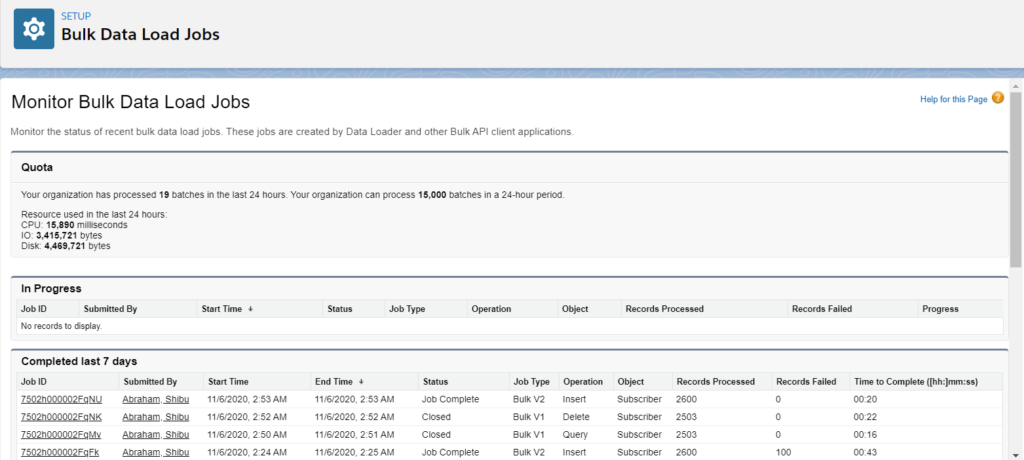
You can also view the Bulk API job requests processed everyday by checking the Bulk Data Load Jobs under Setup in your Salesforce CRM org. By default, CRM orgs would process 15,000 batches per day – and the count will be shown in the Bulk Data Load Jobs page as shown below
How does the Bulk API request work?
The Bulk API request comprises of multiple parts –
- Create a Bulk data job – the state of the request will show as Open
- Upload the data to be processed to this open job – we can only send data in CSV format (at this time)
- Once the data has been uploaded, we send an “Upload Complete” request for this job – which then informs Salesforce that we are done with uploading data. The state of the job then changes to UploadComplete
- Salesforce then queues up the data into batches and starts processing – the state changes to InProgress
- Once all the batches have been processed, the state changes to either JobComplete (successful) or Failed (unsuccessful). You can drill into the respective job using the jobid link and review the “Failed” reason under State Message. In some cases you will see JobComplete with some records as Failed and some Processed – you may not be able to see the exact reason why those records failed in the UI. You will need to query the job using API and fetch the failedResults using /services/data/vXX.X/jobs/ingest/jobId/failedResults/ URI. More details on how to use the Bulk API request is available in the Salesforce documentation.
Pre-requisite steps to follow
In order to get the data from SFMC to SF CRM, below are the steps that we shall be performing. Please do note that this approach is recommended only if you plan to re-use the API code multiple times by scheduling it in an Automation Studio Script Activity. If it’s a one-time send, it may be easier to do an export from the DE and then upload the data through Dataloader into Salesforce CRM.
Identify SFMC Data Extension fields
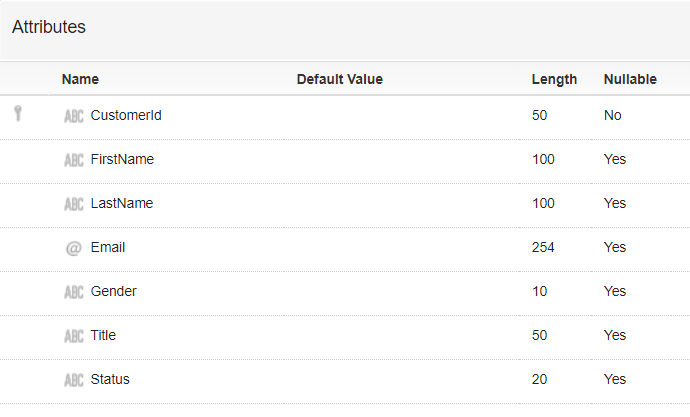
The first step is to identify the Data Extension and fields that you need to send to Salesforce CRM. Make a note of the field names as well as the data type and length as you’ll need this when configuring the object in Salesforce.
For our example, I’ll be using a DE that I created called SFSubscribersDE – which has about 2600 records with the following data structure.
Create Object in Salesforce CRM to store SFMC data
The second step is to create the Subscriber custom object in Salesforce CRM. Use similar names as that of the SFSubscribersDE for ease of mapping – ensure the data types and length of the fields do not cause issues when processing the insert. When you create the object, you will need to provide a unique identifier that shall be called Name – you can either map the CustomerId to it (if unique) or use the Autonumber feature to have a unique id generated in Salesforce for each Subscriber record. In our case, I used the Autonumber feature to identify each record as SUB{00000} – so the ids will get generated as SUB00001, SUB00002, etc. (we won’t be using this field for the rest of the article). We will create a field to map to every field from the SFSubscribersDE.
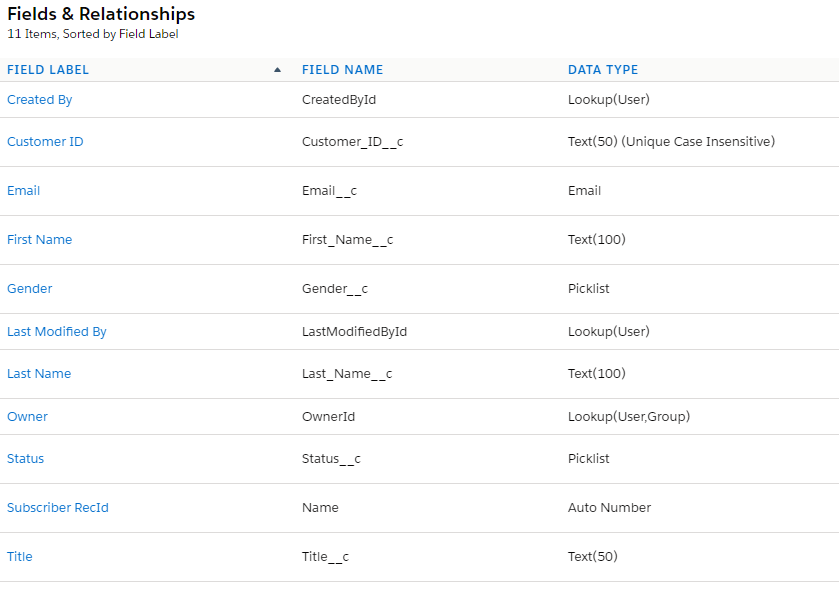
You may use Salesforce specific data types like the Picklist if it makes more sense – for e.g. I have used picklist for the Status field with the values “Active” and “Unsubscribed” – which are the 2 values that I expect from SFMC.
Note: You may choose to map the SFMC data to an existing standard or custom object – like Contact or Lead. In that case, you do not need to create a new object – but you need to verify that the data types and field lengths match or at least will not cause an error on data insertion.
Field API Names of SF Object
Take a note of the field API names of the SF object that you shall be inserting the SFMC data into – you will need to use this in the Bulk API Request. You can view the field API Names under Setup > Object Manager – go to the object you wish to view and click on Fields & Relationships. For the Subscriber custom object, note that the object name is Subscriber__c and the field names are as shown in the previous image. For standard objects like Contact and Lead, the object names are Contact and Lead respectively – only custom objects will be suffixed with an “__c”.
Create Connected App in SF CRM
In order for us to connect to the Salesforce org using REST and create a Bulk request, we need to create a Connected App in Salesforce. Go to Setup > App Manager – and click on New Connected App

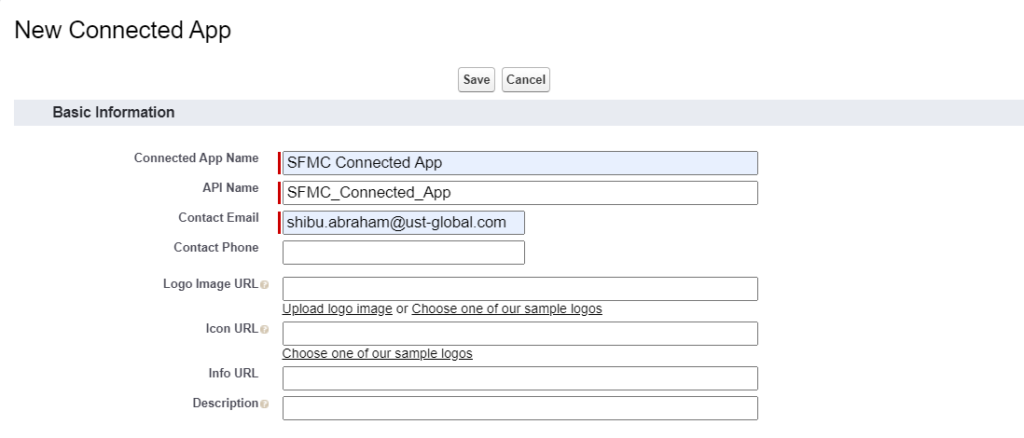
In the New Connected App screen, enter a name for the Connected App – for e.g. SFMC Connected App. The API name will be automatically populated. Also enter your email address in the Contact Email field. You may leave the rest of the fields blank.
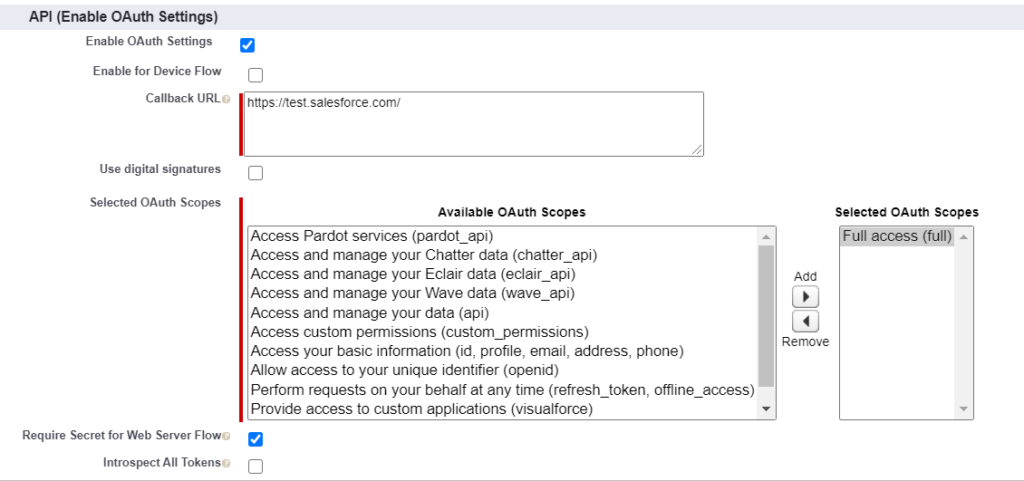
Enable the OAuth Settings checkbox. In the Callback URL – provide “https://test.salesforce.com/” if you are using a Sandbox Salesforce org or “https://login.salesforce.com/” if you are using a Production or Developer edition org. In the OAuth scopes list, choose Full Access. Leave the rest of the values as is and then save.
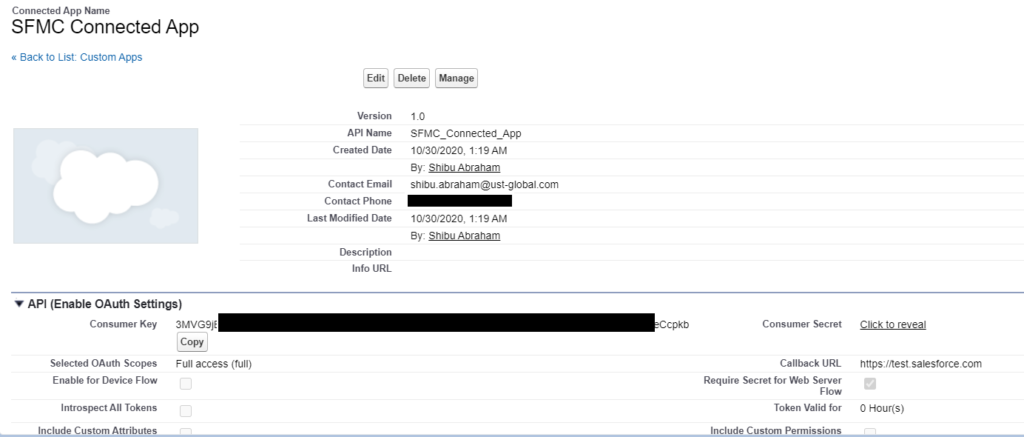
It may take a few minutes but once you create the Connected App, you should be able to see a Client Id (Consumer Key) and Client Secret (Consumer Secret). If for some reason, you closed out the window or need to access these details again, then you need to go to App Manager, scroll through the list and find the Connected App name you created, click on the drop down arrow to the right of the name and select “View”. You should be able to see the Client Id and Client Secret in the view page.
Storing the SF Credentials
I created a separate Data Extension called SFCredentialsDE in SFMC with the below data structure and stored the details in it. We will be using this to authenticate our REST API request later on. You can store multiple credentials in this DE by naming each record appropriately and then using that key to retrieve the corresponding credentials. In our case, I have given the ConnectionName as “SF CRM Connected App”.
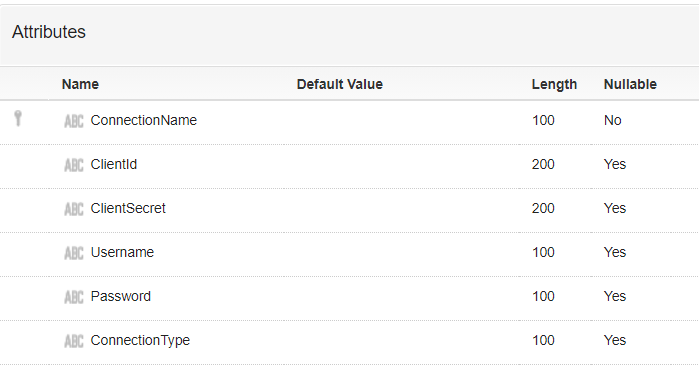
Besides the Client Id and Client Secret that we received from the Connected App earlier, we will also need the username and password of the user with permissions to the connected app and to be able to process data inserts in Salesforce. Store this username and password as well in this DE. Note that the password must include the “Security token” as well – i.e. if you password is Pa55w0rd@123 and Security token is DSefv343kn943mdsSR334n then the password string you need to store in the DE is “Pa55w0rd@123DSefv343kn943mdsSR334n“. If you don’t know your security token (provided it’s for your user login), then click on your Profile icon on the top right and then Settings as shown below.
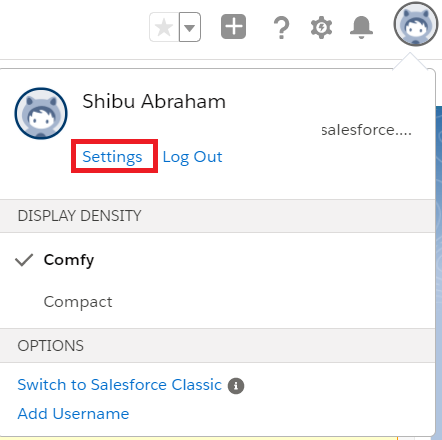
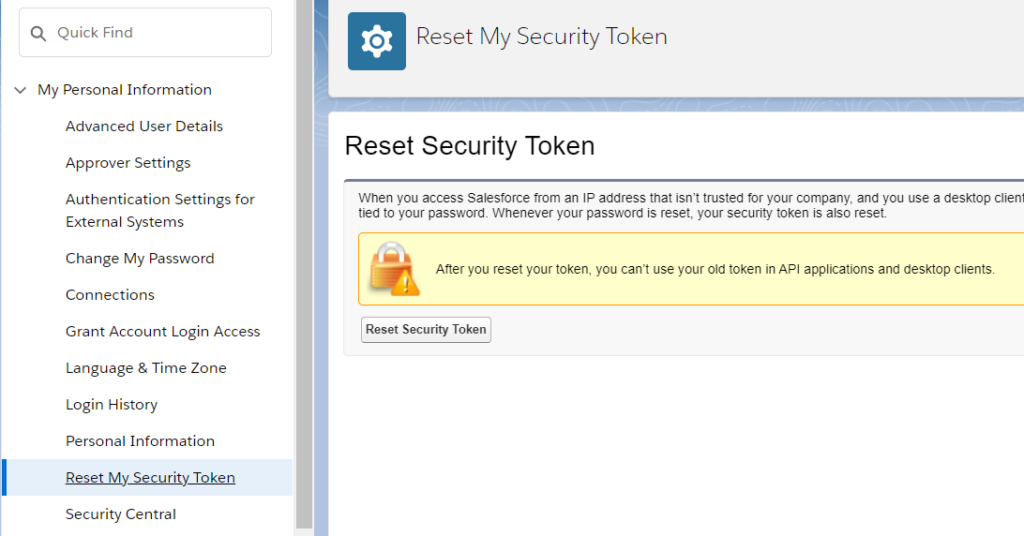
Then go to Reset My Security Token and click the button to reset the token. You should receive an email that’s registered with your user profile with the new Security Token. Do note that if you have used the previous Security Token in any API requests / integrations earlier, it will no longer be valid and hence need to be updated.
I also went ahead and hid this SFCredentialsDE in SFMC using this article given by Ivan Razine. This way, no one would be able to see this DE through the UI – and you will need to keep note of the DE Customer Key to retrieve the data through API.
SSJS Code for the Bulk Data Request
Now that we have done the pre-requisite steps, we can focus on the various code modules that we need to write for the Bulk data request. I have used references from Greg’s articles on Gortonington.com as well as answers from Salesforce StackExchange:
- Using Script.Util to call an external service
- Using WSProxy for retrieving DE records in batches
- SSExch Answer for DE batch retrieves
Retrieving SF Credentials for Authentication
First step is to retrieve the Salesforce credentials we stored in the SFCredentialsDE in SFMC. We will be using the SSJS Core library in our script as well as WSProxy to retrieve the DE records. If you wish to access a different BU from where your code is currently executing, then you can impersonate the same by passing it in the mid variable and setting it in WSProxy using the setClientId method.
I’ve written the function getSFCredentials() and passing it the mid to set. We also need to provide the External key of the SFCredentialsDE here along with the field columns to be retrieved. In my case, I am using the SFCredentialsDE for storing mutliple connection credentials – so in this case, I’ll need to check by iterating through each record for the ConnectionName = “SF CRM Connected App” – and once the record is found, we store the values of the fields in our variables and then break out of the loop.
I’ve used the host url as “https://test.salesforce.com/services” since I’m using a Salesforce Sandbox – but if you are using a Production instance or Developer Edition, then you must use “https://login.salesforce.com/services”
<script runat=server>
Platform.Load('Core','1');

//use this for Salesforce sandbox.
//For prod/dev edition use https://login.salesforce.com/services
var host = 'https://test.salesforce.com/services';

var clientid, clientsecret, username, password;
var prox = new Script.Util.WSProxy();
var mid = 123456;   //Provide your BU MID here

getSFCredentials(mid);

function getSFCredentials(mid) {
    if(mid) {
      prox.setClientId({ "ID": mid }); //Impersonates the BU
    }

     //External key of DE with SF Credentials
   	var deCustKey = "XXXX-XXXX-XXXXX-XXXXXX";
   	var cols = ["ConnectionName","ClientId","ClientSecret","Username","Password"];
	var deReturn = prox.retrieve("DataExtensionObject[" + deCustKey + "]", cols);
   	var deResults = deReturn.Results;

        var credRtvd = false;

   	for (var i=0; i<deResults.length; i++){
       	if (credRtvd) break;
      	var deRecord = deResults[i];
       	for (var j=0; j<deRecord.Properties.length; j++){
            var name =  deRecord.Properties[j].Name;
            var value = deRecord.Properties[j].Value;

           if (name == "ConnectionName" && value == "SF CRM Connected App") {
                credRtvd = true;
            }
           if (name == "ClientId") {
                clientid = value;
            }
           if (name == "ClientSecret") {
                clientsecret = value;
            }
           if (name == "Username") {
                username = value;
            }
           if (name == "Password") {
                password = value;
            }
        }
    }
}

</script>
Get Auth Token from SF CRM
Our next step is to send a REST API call to SF CRM to get the Authorization token using the credentials we retrieved in the previous step. We can write a function retrieveToken() and pass the host and credentials. I have used the Script.Util feature in SSJS to invoke the REST API callout to SF CRM.
function retrieveToken(host,clientid,clientsecret,username,password) {

    var tokenstr = "/oauth2/token?grant_type=password&client_id="+clientid+"&client_secret="+clientsecret+"&username="+username+"&password="+password;
    var url = host + tokenstr;
    var req = new Script.Util.HttpRequest(url);
    req.emptyContentHandling = 0;
    req.retries = 2;
    req.continueOnError = true;
    req.contentType = "application/json";
    req.method = "POST";

    var resp = req.send();
    var resultStr = String(resp.content);
    var resultJSON = Platform.Function.ParseJSON(String(resp.content));

    return resultJSON;
}
If the request is successful, then the response shall contain the auth token as well as the instance url to be used. We shall be storing these in token and instURL variables and pass it in subsequent function calls.
    var tokenResp = retrieveToken(host,clientid,clientsecret,username,password);


    var token = tokenResp.access_token;
    var instURL = tokenResp.instance_url;
Create Bulk Data Job
Once we have the auth token, we can go ahead and initiate the REST request of POST method type to create the Bulk Data job in SF CRM. I’ve created a function called createBulkReq() and passed the instURL and token variables which we received from the earlier request.
In this request, we need to construct a payload with an object key specifying the SF CRM object to which we shall be inserting the data, the operation type as “insert”, contentType as “CSV” and lineEnding as “CRLF”.
function createBulkReq(host,token) {

    var url = host + '/services/data/v49.0/jobs/ingest/';
    var payload = {}
    payload.object = "Subscriber__c";
    payload.contentType = "CSV";
    payload.operation = "insert";
    payload.lineEnding = "CRLF";

    var req = new Script.Util.HttpRequest(url);
    req.emptyContentHandling = 0;
    req.retries = 2;
    req.continueOnError = true;
    req.contentType = "application/json";
    req.method = "POST";
    req.setHeader("Authorization", "Bearer " + token);
    req.postData = Stringify(payload);

    var resp = req.send();
    var resultStr = String(resp.content);
    var resultJSON = Platform.Function.ParseJSON(String(resp.content));

    return resultJSON;
}
If the request is successful, then the response shall contain the job id of the Bulk Data job that got created. We shall be storing this in jobid variable and pass it in subsequent function calls.
    var bulkJobJSON = createBulkReq(instURL, token);


    var jobid = bulkJobJSON.id;
Fetch DE Records and Upload CSV Data
Next we need to fetch the records from SFSubscribersDE – we will use the WSProxy object we created earlier for the same. I’ve created a function called processBatchData() and passing in the instURL, token, jobid and the mid (BU ID). We need to specify the External key of the SFSubscribersDE in this function along with the field columns to retrieve.
I’ve written the WSProxy retrieve in the getDERowsArray() function – the first retrieval shall have 2 properties returned – HasMoreRows and RequestID. The former is a boolean value and be true if there’s more records to be retrieved. This is because WSProxy retrieves 2500 records at a time – so if we have more, then the additional records will be fetched in batches. Hence for the subsequent calls, the retrieval function is slightly different wherein we use the reqId (which has RequestID value) instead of cols and we repeat the loop using the value of moreData (which has the HasMoreRows value). In our example, we have 2600 records in the DE – hence the loop runs twice and then exits.
Now we initialize a csvData variable to store the full string data that we need to send in the Upload Data request. The first row of the csvData variable should be the field name headers – which are the field API names of the Subscriber__c object we identified earlier. We then add each record that has been returned to an array, use the join method to get in the form of CSV appended by “\r\n” to represent CRLF and then add it to the csvData variable.
Note: On the first batch retrieval, the results that were returned had exactly the 7 fields that’s mentioned in cols – but I kept getting errors on subsequent batches when processing the data in the Bulk Data Job. This is because WSProxy returns an additional field in the results on subsequent batch retrievals called “_CustomObjectKey” – so I had to exclude this from being added into csvData and then it worked like a charm.
Once we have all the data we need in the csvData variable, we then call the updateBulkReq() function passing it the instURL, token, jobid and ofcourse csvData. We will use the Script.Util feature again to callout using REST – this time we shall use the PUT method type.
A couple of important points to note –
- The Bulk Job request allows only one PUT request to upload the data – you cannot send multiple PUT requests to the same job id once it’s open. PATCH shall not work either (I did try both). Based on some of the answers in StackExchange, that’s how Bulk API 2.0 works – and even though they say Batches, the data upload is just ONE big set – whereas Salesforce processes the uploaded data in Batches.
- Since there’s a limit of 150MB, it’s recommended to check the size of the data being retrieved from the DE. This 150MB should be inclusive of any encryption – so if you add base64 encoding, it will increase the size of the overall data.
function processBatchData(instURL, token, jobid, mid) {
    //Provide External key for SFSubscribersDE
    var deCustKey = "XXXX-XXXX-XXXX-XXXX";
    //SFSubscribersDE Fields
    var cols = ["CustomerId","FirstName","LastName","Email","Gender","Title","Status"];
    var moreData = true;                  																		//To validate if more data in Retrieve
    var reqID = null;                   																		//Used with Batch Retrieve to get more data
    var batchCount = 0;
    //String to store CSV Data to send to SF Bulk API
    var csvData = "Customer_ID__c,First_Name__c,Last_Name__c,Email__c,Gender__c,Title__c,Status__c" + "\r\n";

    while (moreData){
      	batchCount++;
        moreData = false;
        //Call function to get records from DE
        var deReturn = getDERowsArray(mid, deCustKey, cols, reqID);

        moreData = deReturn.HasMoreRows;
        reqID = deReturn.RequestID;

        //iterate for each batch of 2500 records returned
       	for (var i = 0; i < deReturn.Results.length; i++) {
         	var recArray = [];
           	var currRecord = deReturn.Results[i];
		 	for (var j = 0; j < currRecord.Properties.length; j++) {
              	    if (currRecord.Properties[j].Name != "_CustomObjectKey")
                    recArray.push(currRecord.Properties[j].Value);
                }
           	csvData += recArray.join(",") + "\r\n";
        }
      	//Use batchCount if needed for debug log to identify number of batches called;
    }
    //Send update request to Bulk API job with final CSV Data
    var updJobJSON = updateBulkReq(instURL, token, jobid, csvData);
}

function getDERowsArray(mid, deCustKey, cols, reqID){
    if(mid) {
      prox.setClientId({ "ID": mid }); //Impersonates the BU
    }

    if (reqID == null) {
      var deRecs = prox.retrieve("DataExtensionObject[" + deCustKey + "]", cols); //executes the proxy call
    } else {
      deRecs = prox.getNextBatch("DataExtensionObject[" + deCustKey + "]", reqID);
    }

    return deRecs;
}

function updateBulkReq(host,token,jobid,csvData) {

    var url = host + '/services/data/v49.0/jobs/ingest/'+jobid+'/batches';
    var req = new Script.Util.HttpRequest(url);
    req.emptyContentHandling = 0;
    req.retries = 2;
    req.continueOnError = true;
    req.contentType = "text/csv";
    req.method = "PUT";
    req.setHeader("Authorization", "Bearer " + token);
    req.postData = csvData;

    var resp = req.send();
    var resultStr = String(resp.content);
    var resultJSON = Platform.Function.ParseJSON(String(resp.content));

    return resultJSON;
}
Close the Bulk Data Job
The last step is to send a request to close the Bulk Data job. This will be a PATCH request specifying the jobid. The payload shall have just one key called state with value “UploadComplete”. This is and indicator for Salesforce to start processing the Bulk Data job.
function closeBulkReq(host,token,jobid) {

    var url = host + '/services/data/v49.0/jobs/ingest/'+jobid;
    var payload = {}
    payload.state = "UploadComplete";

    var req = new Script.Util.HttpRequest(url);
    req.emptyContentHandling = 0;
    req.retries = 2;
    req.continueOnError = true;
    req.contentType = "application/json";
    req.method = "PATCH";
    req.setHeader("Authorization", "Bearer " + token);
    req.postData = Stringify(payload);

    var resp = req.send();
    var resultStr = String(resp.content);
    var resultJSON = Platform.Function.ParseJSON(String(resp.content));

    return resultJSON;
}
Verifying the Bulk Data Job Request
After having closed the Bulk Data Job request, we can now proceed to check the status of the job in Salesforce. Go to Setup > Bulk Data Load Jobs and review the last updated job id – depending on how fast the processing happens, you may see the state as either UploadComplete or InProgress. The former means that Salesforce has just received confirmation that the job is Closed and can now begin processing. If it’s InProgress, then it means Salesforce is processing the uploaded data in batches. You can drill down into the specific job to review queued status. Since this is an asynchronous process, we cannot determine the exact time within which the job shall be completed. Once the Job completes, we shall be able to view the state as JobComplete or Failed.
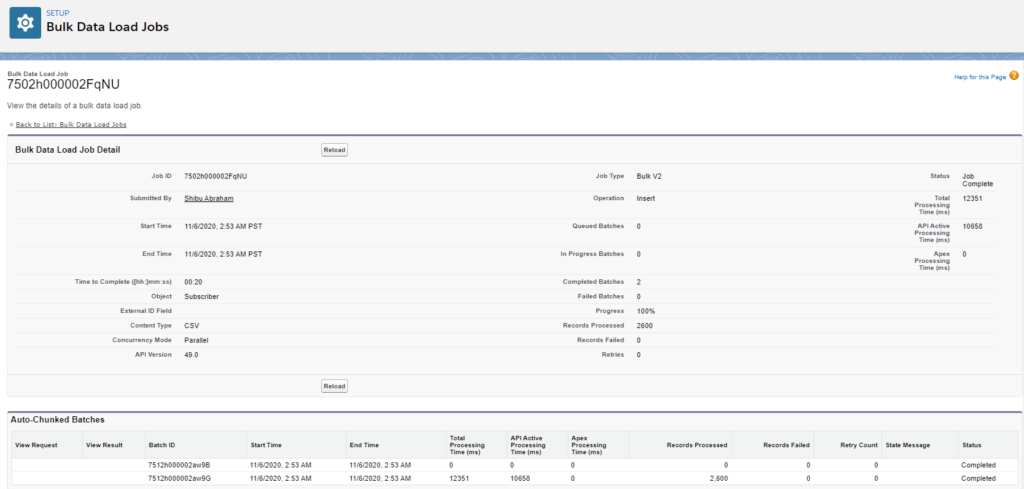
You can then verify the data records (if processed successfully) by going to the custom object list view as shown below

If you wish to get the status of a specific Bulk Data job, then you can use the GET request with following details:
Content-Type: application/json; charset=UTF-8
Accept: application/json/services/data/vXX.X/jobs/ingest/jobId/Additional Notes
I have not added error handling or debug logging statements in the above code snippets – before using this for actual production scenarios, it’s highly recommended to add exception handling try-catch statements and debug logging to a DE (if this is expected to be executed from a Script Activity).
Final Code
The full SSJS code for the above scenario is as below – good luck and happy coding!
<script runat=server>
Platform.Load('Core','1');

//use this for Salesforce sandbox.
//For prod/dev edition use https://login.salesforce.com/services
var host = 'https://test.salesforce.com/services';

var clientid, clientsecret, username, password;
var prox = new Script.Util.WSProxy();
var mid = 123456;   //Provide your BU MID here

getSFCredentials(mid);

if (clientid && clientsecret && username && password) {
    //Write("Credentials Received - processing bulk api ...<br>");
    var tokenResp = retrieveToken(host,clientid,clientsecret,username,password);

    var token = tokenResp.access_token;
    var instURL = tokenResp.instance_url;

    var bulkJobJSON = createBulkReq(instURL, token);

    var jobid = bulkJobJSON.id;

    processBatchData(instURL, token, jobid, mid);

    var bulkJobCloseJSON = closeBulkReq(instURL, token, jobid);
    //Write("Bulk API job complete<br>");
}

function getSFCredentials(mid) {
    if(mid) {
      prox.setClientId({ "ID": mid }); //Impersonates the BU
    }

     //External key of DE with SF Credentials
   	var deCustKey = "XXXX-XXXX-XXXXX-XXXXXX";
   	var cols = ["ConnectionName","ClientId","ClientSecret","Username","Password"];
	var deReturn = prox.retrieve("DataExtensionObject[" + deCustKey + "]", cols);
   	var deResults = deReturn.Results;
        var credRtvd = false;

   	for (var i=0; i<deResults.length; i++){
       	if (credRtvd) break;
      	var deRecord = deResults[i];
       	for (var j=0; j<deRecord.Properties.length; j++){
            var name =  deRecord.Properties[j].Name;
            var value = deRecord.Properties[j].Value;

           if (name == "ConnectionName" && value == "SF CRM Connected App") {
                credRtvd = true;
            }
           if (name == "ClientId") {
                clientid = value;
            }
           if (name == "ClientSecret") {
                clientsecret = value;
            }
           if (name == "Username") {
                username = value;
            }
           if (name == "Password") {
                password = value;
            }
        }
    }
}

function retrieveToken(host,clientid,clientsecret,username,password) {

    var tokenstr = "/oauth2/token?grant_type=password&client_id="+clientid+"&client_secret="+clientsecret+"&username="+username+"&password="+password;
    var url = host + tokenstr;
    var req = new Script.Util.HttpRequest(url);
    req.emptyContentHandling = 0;
    req.retries = 2;
    req.continueOnError = true;
    req.contentType = "application/json";
    req.method = "POST";

    var resp = req.send();
    var resultStr = String(resp.content);
    var resultJSON = Platform.Function.ParseJSON(String(resp.content));

    return resultJSON;
}

function createBulkReq(host,token) {

    var url = host + '/services/data/v49.0/jobs/ingest/';
    var payload = {}
    payload.object = "Subscriber__c";
    payload.contentType = "CSV";
    payload.operation = "insert";
    payload.lineEnding = "CRLF";

    var req = new Script.Util.HttpRequest(url);
    req.emptyContentHandling = 0;
    req.retries = 2;
    req.continueOnError = true;
    req.contentType = "application/json";
    req.method = "POST";
    req.setHeader("Authorization", "Bearer " + token);
    req.postData = Stringify(payload);

    var resp = req.send();
    var resultStr = String(resp.content);
    var resultJSON = Platform.Function.ParseJSON(String(resp.content));

    return resultJSON;
}

function processBatchData(instURL, token, jobid, mid) {
    //Provide External key for SFSubscribersDE
    var deCustKey = "XXXX-XXXX-XXXX-XXXX";
    //SFSubscribersDE Fields
    var cols = ["CustomerId","FirstName","LastName","Email","Gender","Title","Status"];
    var moreData = true;                  																		//To validate if more data in Retrieve
    var reqID = null;                   																		//Used with Batch Retrieve to get more data
    var batchCount = 0;
    //String to store CSV Data to send to SF Bulk API
    var csvData = "Customer_ID__c,First_Name__c,Last_Name__c,Email__c,Gender__c,Title__c,Status__c" + "\r\n";

    while (moreData){
      	batchCount++;
        moreData = false;
        //Call function to get records from DE
        var deReturn = getDERowsArray(mid, deCustKey, cols, reqID);

        moreData = deReturn.HasMoreRows;
        reqID = deReturn.RequestID;

        //iterate for each batch of 2500 records returned
       	for (var i = 0; i < deReturn.Results.length; i++) {
         	var recArray = [];
           	var currRecord = deReturn.Results[i];
		 	for (var j = 0; j < currRecord.Properties.length; j++) {
              	    if (currRecord.Properties[j].Name != "_CustomObjectKey")
                    recArray.push(currRecord.Properties[j].Value);
                }
           	csvData += recArray.join(",") + "\r\n";
        }
      	//Use batchCount if needed for debug log to identify number of batches called;
    }
    //Send update request to Bulk API job with final CSV Data
    var updJobJSON = updateBulkReq(instURL, token, jobid, csvData);
}

function getDERowsArray(mid, deCustKey, cols, reqID){
    if(mid) {
      prox.setClientId({ "ID": mid }); //Impersonates the BU
    }

    if (reqID == null) {
      var deRecs = prox.retrieve("DataExtensionObject[" + deCustKey + "]", cols); //executes the proxy call
    } else {
      deRecs = prox.getNextBatch("DataExtensionObject[" + deCustKey + "]", reqID);
    }

    return deRecs;
}

function updateBulkReq(host,token,jobid,csvData) {

    var url = host + '/services/data/v49.0/jobs/ingest/'+jobid+'/batches';
    var req = new Script.Util.HttpRequest(url);
    req.emptyContentHandling = 0;
    req.retries = 2;
    req.continueOnError = true;
    req.contentType = "text/csv";
    req.method = "PUT";
    req.setHeader("Authorization", "Bearer " + token);
    req.postData = csvData;

    var resp = req.send();
    var resultStr = String(resp.content);
    var resultJSON = Platform.Function.ParseJSON(String(resp.content));

    return resultJSON;
}

function closeBulkReq(host,token,jobid) {

    var url = host + '/services/data/v49.0/jobs/ingest/'+jobid;
    var payload = {}
    payload.state = "UploadComplete";

    var req = new Script.Util.HttpRequest(url);
    req.emptyContentHandling = 0;
    req.retries = 2;
    req.continueOnError = true;
    req.contentType = "application/json";
    req.method = "PATCH";
    req.setHeader("Authorization", "Bearer " + token);
    req.postData = Stringify(payload);

    var resp = req.send();
    var resultStr = String(resp.content);
    var resultJSON = Platform.Function.ParseJSON(String(resp.content));

    return resultJSON;
}
</script>
Nice one Shibu…. Keep sharing 😊
Hello sir..You have taken lots of effort to write this blog.. Thanks..
I am requesting you to upload the simple Salesforce to any other platform integration.